红黑树
虽然AVL树作为绝对的平衡搜索二叉树,有着极高的查询效率,但正因为其严格的要求,修改AVL树的某个结点时,可能要一路调整到根节点,效率低下。为了解决这一痛点,略微没那么严格的近似平衡搜索二叉树,即红黑树被提出
红黑树的概念
红黑树,是一种二叉搜索树,但在每个结点上增加一个存储位表示结点的颜色,可以是Red或Black。 通过对任何一条从根到叶子的路径上各个结点着色方式的限制,红黑树确保没有一条路径会比其他路径长出俩倍,因而是接近平衡的。

红黑树的性质
首先与一般的定义不同,在红黑树中将空指针(上图为NIL)作为叶子节点,然后我们来讨论具体的性质
- 每个结点不是
红色就是黑色
- 根节点必定是
黑色的
- 如果一个结点是
红色的,则它的两个孩子结点是黑色的
- 对于每个结点,该结点到其所有后代叶结点的简单路径上,均包含相同数目的
黑色结点
- 每个叶子结点都是
黑色的此处的叶子结点指的是空结点NIL
思考:为什么满足上面的性质,红黑树就能保证:其最长路径中节点个数不会超过最短路径节点个数的两倍?
红黑树的性质保证了从根节点到所有叶子结点(空结点)的路径上,包含相同数量的黑色结点。这是红黑树平衡性的重要保证,以下是如何保证最长路径不会超过最短路径两倍的具体解释:
- 黑色高度的定义:
- 对于红黑树中的每个结点,定义其黑色高度为从该结点到叶子结点的路径上黑色结点的数量。根据性质 4,这个数量在所有路径上都是相同的。
- 设定黑色高度为
h。那么从根到任意叶子结点的路径都包含h个黑色结点。
- 红色结点的插入:
- 根据性质3,如果一个结点是红色的,则它的两个孩子结点是黑色的。这就意味着每个红色结点必定有两个黑色的孩子。
- 因此,从根到叶子结点的路径上,红色结点与黑色结点交替出现,红色结点之间的路径长度会相对较短。
- 路径长度的关系:
- 根到一个叶子结点的路径的最长可能路径是最短路径的两倍。这是因为每个红色结点都在路径上增加了一个额外的层级,但它们只增加了一个红色结点的高度,而黑色结点的数量不变。
- 如果某条路径上有
r 个红色结点,那么该路径的总长度将是 h + r,其中 h 是黑色结点的数量。因为红色结点的数量 r 可以最大等于 h,所以最长路径的长度 h + r最大为 2h,即最长路径的长度不会超过最短路径的两倍。
红黑树的实现
这里我们仿照STL30的源码,再用更简洁易懂的代码形式实现红黑树,比如节点和迭代器的双层设计,这里就不使用了
红黑树结点
- 因为要经常访问父结点,所以这里用三叉链表维护树结构
- 红黑树的节点需要一个变量表示颜色,这里用
typedef把bool类型封装为Color类
- 使用模板来存储泛类型的值
1
2
3
4
5
6
7
8
9
10
11
12
13
14
15
16
17
18
19
20
21
22
23
24
25
26
| #pragma once
#include <functional>
typedef bool Color;
const Color Red = false;
const Color Black = true;
template <class ValueType>
struct RBTreeNode
{
typedef RBTreeNode<ValueType> Node;
Node* _left;
Node* _right;
Node* _parent;
Color _color;
ValueType _value;
RBTreeNode(const ValueType& val, Color color)
:_value(val)
, _color(color)
, _left(nullptr)
, _right(nullptr)
, _parent(nullptr)
{}
};
|
红黑树的基本结构
- 模板参数:红黑树也是
KV类型的二叉树,所以模板参数有:
K:即Key,节点使用K类型的参数比较V:即ValueType,构造红黑树结点时传入的模板参数KeyOfValue:因为节点将Key值也存在了节点的值域,所以需要外部传入仿函数KeyOfValue将Key值取出Compare:允许外部自定义K类型的比较规则
- typedef封装:
typedef RBTreeNode<V> Node;
- 私有成员变量:
Compare _cmp:声明一个仿函数成员变量,整个对象里都能直接调用KeyOfValue _kof:用处同上Node* _header
- 默认构造函数:
- 使用缺省传入
const Compare&类型定义的std::greater<K>()临时对象
- 创建哨兵位作为头结点,使后续对根结点的调整与一般情况统一
- 私有函数
GetRoot() left() right()
- 将对根节点的获取封装起来,使代码更直观
- 简化代码,获取左右子树
至于迭代器的封装,我们在后文实现
1
2
3
4
5
6
7
8
9
10
11
12
13
14
15
16
17
18
19
20
21
22
23
24
25
26
27
28
29
30
31
32
33
34
35
36
37
38
39
40
41
42
43
44
| template<class K,class V,class KeyOfValue,class Compare = std::greater<int> >
class RBTree
{
typedef RBTreeNode<V> Node;
public:
RBTree(const Compare& cmp =Compare())
:_cmp(cmp), _header(nullptr)
{
_header = new Node(V(), Black);
}
private:
Node* GetRoot()
{
if (_header->_parent == _header)return nullptr;
else return _header->_parent;
}
Node* SetRoot(Node* root)
{
if (root == nullptr)return nullptr;
root->_parent = _header;
_header->_parent = root;
}
Node* left(Node* root)
{
if (root == nullptr)return nullptr;
return root->_left;
}
Node* right(Node* root)
{
if (root == nullptr)return nullptr;
return root->_right;
}
private:
Compare _cmp;
KeyOfValue _kof;
Node* _header;
};
|
红黑树的插入
和AVL树一样,红黑树的插入也分为两步新增结点和调整
新增结点
关于根结点的颜色,前面的规定性质里也说了,根节点为黑色,这里在重申一下为什么一定是黑色
- 简化性质的维护:根节点为黑色可以简化在插入和删除操作后维持红黑树性质的过程。特别是在插入节点时,新的节点(通常为红色)可能违反了红黑树的性质。根节点为黑色确保了在树的高度平衡和黑色节点数量保持一致的情况下,维护这些性质更加容易。
- 平衡树的高度:红黑树的性质确保了树的高度约为 ( \log(n) ),其中 ( n ) 是树中节点的数量。通过将根节点设为黑色,红黑树的黑色高度(从根到所有叶子节点的黑色节点数目)得到保证,从而有助于维护树的平衡。
- 避免违反性质:如果根节点允许是红色,可能会导致在某些情况下难以保证红色节点的数量平衡,特别是在连续插入和删除操作之后。将根节点设为黑色可以避免这种复杂情况,从而简化了实现和维护过程。
首先我们先写个Find函数防止插入重复数据
1
2
3
4
5
6
7
8
9
10
11
12
13
14
15
16
17
18
19
20
21
22
23
24
| public:
bool Find(const K& key)
{
Node* prev = nullptr;
Node* cur = GetRoot();
while (cur)
{
if (_cmp(_kof(cur->_value), key))
{
prev = cur;
cur = left(cur);
}
else
{
cur = right(cur);
}
}
if (prev == nullptr || _cmp(_kof(prev->_value),key))
{
return false;
}
else return true;
}
|
关于新结点(非根)的颜色,这里规定为红色,使新结点对红黑树中黑树高度的影响最小
1
2
3
4
5
6
7
8
9
10
11
12
13
14
15
16
17
18
19
20
21
22
23
24
25
26
27
28
29
30
31
32
33
34
35
36
37
38
39
40
41
42
43
44
45
46
| public:
Node* proot = GetRoot();
if (proot == nullptr)
{
Node* newnode = new Node(value, Black);
newnode->_parent = _header;
_header->_parent = newnode;
return true;
}
if (Find(_kof(value)))return false;
Node* cur = proot;
Node* parent = proot->_parent;
while (cur)
{
if (_cmp(_kof(cur->_value), _kof(value)))
{
parent = cur;
cur = left(cur);
}
else
{
parent = cur;
cur = right(cur);
}
}
Node* newnode = new Node(value, Red);
if (_cmp(_kof(parent->_value),_kof(value) ))
{
parent->_left = newnode;
newnode->_parent = parent;
}
else
{
parent->_right = newnode;
newnode->_parent = parent;
}
|
调整红黑树
每次新节点插入后,都要检测红黑树的性质是否造到破坏
因为新节点的默认颜色是红色,因此:如果其双亲节点的颜色是黑色,没有违反红黑树任何性质,则不需要调整;但当新插入节点的双亲节点颜色为红色时,就违反了性质三不能有连在一起的红色节点,此时需要对红黑树分情况来讨论:
约定 cur当前结点,parent为父结点,uncle为叔叔结点,gp为祖父结点
情况一:直接染色

- 可以看到这种情况只需染色即可,将
gp染色为红色,防止整棵树的黑树高度改变0
- 不过当该树为整棵树而不是子树时,根节点(
gp)在最后还需染色回黑色(这里留到所有调整的最后)
- 当该树为子树,即
gp存在父结点时,因为gp变为了红色,还需继续向上调整

情况二:单次旋转+染色
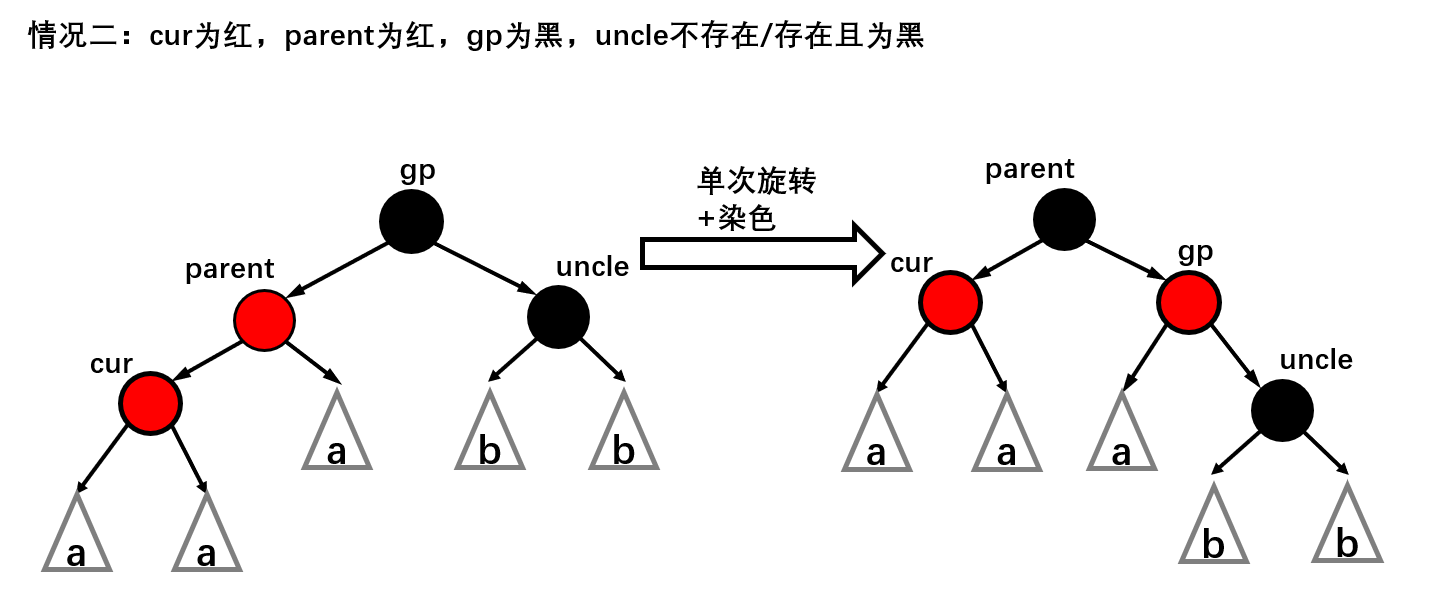
- 图中
uncle的情况有两种
- 如果
uncle节点不存在,则cur一定是新插入节点,因为如果cur不是新插入节点,则cur和parent一定有一个节点的颜色是黑色,就不满足性质4:每条路径黑色节点个数相同。
- 如果
uncle节点存在,则其一定是黑色的,那么cur节点原来的颜色一定是黑色的,现在看到其是红色的原因是因为cur的子树在调整的过程中将cur节点的颜色由黑色改成红色。
- 调整步骤:
parent为pg的左孩子,cur为parent的左孩子,则进行右单旋转parent为pg的右孩子,cur为parent的右孩子,则进行左单旋转parent->黑色pg->红色
情况三:两次旋转

- 如图,一次旋转后变成了情况二,所以总共要旋转两次
parent为gp的左孩子,cur为parent的右孩子,则针对parent做左单旋转pparent为gp的右孩子,cur为parent的左孩子,则针对parent做右单旋转
- 变成情况二后按情况二处理即可
封装代码
旋转操作的代码量较大,我们选择封装到成员函数中
1
2
3
4
5
6
7
8
9
10
11
12
13
14
15
16
17
18
19
20
21
22
23
24
25
26
27
28
29
30
31
32
33
34
35
36
37
38
39
40
41
42
43
44
45
46
47
48
49
50
51
52
53
54
55
56
57
58
59
60
61
62
63
64
65
66
67
68
69
70
71
72
73
74
75
76
77
78
79
80
81
82
83
84
85
86
87
88
89
90
91
92
93
94
95
96
97
98
| private:
void RotateR(Node* node)
{
if (node == nullptr)assert(false);
Node* cur = node;
Node* parent = cur->_parent;
if (parent == nullptr) assert(false);
Node* gp = parent->_parent;
if (gp == nullptr) assert(false);
Node* ggp = gp->_parent;
if (gp == ggp->_left)ggp->_left = parent;
else ggp->_right = parent;
parent->_parent = ggp;
gp->_left = parent->_right;
if (parent->_right)parent->_right->_parent = gp;
parent->_right = gp;
gp->_parent = parent;
if (gp == GetRoot())
{
SetRoot(parent);
}
parent->_color = Black;
gp->_color = Red;
}
void RotateL(Node* node)
{
Node* cur = node;
if (cur == nullptr)assert(false);
Node* parent = cur->_parent;
if (parent == nullptr)assert(false);
Node* gp = parent->_parent;
if (gp == nullptr)assert(false);
Node* ggp = gp->_parent;
if (ggp->_left == gp) ggp->_left = parent;
else ggp->_right = parent;
parent->_parent = ggp;
gp->_right = parent->_left;
if (parent->_left)parent->_left->_parent = gp;
parent->_left = gp;
gp->_parent = parent;
if (gp == GetRoot())
{
SetRoot(parent);
}
parent->_color = Black;
gp->_color = Red;
}
void RotateLR(Node* node)
{
Node* cur = node;
if (cur == nullptr)assert(false);
Node* parent = cur->_parent;
if (parent == nullptr)assert(false);
Node* gp = parent->_parent;
if (gp == nullptr) assert(false);
parent->_right = cur->_left;
if (cur->_left)cur->_left->_parent = parent;
cur->_left = parent;
parent->_parent = cur;
cur->_parent = gp;
gp->_left = cur;
RotateR(parent);
}
void RotateRL(Node* node)
{
Node* cur = node;
if (cur == nullptr)assert(false);
Node* parent = cur->_parent;
if (parent == nullptr)assert(false);
Node* gp = parent->_parent;
if (gp == nullptr) assert(false);
parent->_left = cur->_right;
if (cur->_right)cur->_right->_parent = parent;
cur->_right = parent;
parent->_parent = cur;
cur->_parent = gp;
gp->_right = cur;
RotateL(parent);
}
|
然后将Insert函数补充完整
1
2
3
4
5
6
7
8
9
10
11
12
13
14
15
16
17
18
19
20
21
22
23
24
25
26
27
28
29
30
31
32
33
34
35
36
37
38
39
40
41
42
43
44
45
46
47
48
49
50
51
52
53
54
55
56
57
58
59
60
61
62
63
64
65
66
67
68
69
70
71
72
73
74
75
76
77
78
79
80
81
82
83
84
85
86
87
88
| public:
bool Insert(const V& value)
{
Node* proot = GetRoot();
if (proot == nullptr)
{
Node* newnode = new Node(value, Black);
newnode->_parent = _header;
_header->_parent = newnode;
return true;
}
if (Find(_kof(value)))return false;
Node* cur = proot;
Node* parent = proot->_parent;
while (cur)
{
if (_cmp(_kof(cur->_value), _kof(value)))
{
parent = cur;
cur = left(cur);
}
else
{
parent = cur;
cur = right(cur);
}
}
Node* newnode = new Node(value, Red);
if (_cmp(_kof(parent->_value),_kof(value) ))
{
parent->_left = newnode;
newnode->_parent = parent;
}
else
{
parent->_right = newnode;
newnode->_parent = parent;
}
cur = newnode;
while (parent != _header && parent->_color == Red)
{
Node* gp = parent->_parent;
Node* uncle = nullptr;
if (parent == gp->_left)uncle = gp->_right;
else uncle = gp->_left;
if (uncle && uncle->_color == Red)
{
parent->_color = Black;
uncle->_color = Black;
gp->_color = Red;
cur = gp;
parent = gp->_parent;
}
else if (cur == parent->_left && parent == gp->_left)
{
RotateR(cur);
break;
}
else if (cur == parent->_right && parent == gp->_right)
{
RotateL(cur);
break;
}
else if (cur == parent->_right && parent == gp->_left)
{
RotateLR(cur);
break;
}
else if (cur == parent->_left && parent == gp->_right)
{
RotateRL(cur);
break;
}
}
Node* root = GetRoot();
root->_color = Black;
return true;
}
|
红黑树的删除
让红黑树和进程一起被清理也不是不行
under construction
红黑树的验证、高度和遍历
下面再补充一些获取红黑树参数的接口
1
2
3
4
5
6
7
8
9
10
11
12
13
14
15
16
17
18
19
20
21
22
23
24
25
26
27
28
29
30
31
32
33
34
35
36
37
38
39
40
41
42
43
44
45
46
47
48
49
50
51
52
53
54
55
56
57
58
59
60
61
62
63
64
65
66
67
68
69
70
71
| public:
void Inorder()
{
_Inorder(GetRoot());
std::cout << "nullptr" << std::endl;
}
protected:
void _Inorder(Node* root)
{
if (root == nullptr) return;
_Inorder(root->_left);
std::cout << root->_value << "->";
_Inorder(root->_right);
}
public:
int Height()
{
return _Height(GetRoot());
}
private:
int _Height(Node* root)
{
if (root == nullptr) return 0;
int LHeight = _Height(root->_left);
int RHeight = _Height(root->_right);
if (LHeight > RHeight) return LHeight + 1;
else return RHeight + 1;
}
public:
bool IsValidRBTree()
{
Node* root = GetRoot();
if (root->_color != Black)return false;
int blackCount = 0;
Node* cur = root;
while (cur)
{
if (cur->_color == Black) blackCount++;
cur = cur->_left;
}
blackCount++;
return _IsValidRBTree(root,0,blackCount);
}
protected:
bool _IsValidRBTree(Node* root,int cnt,const int blackCount)
{
if (root == nullptr)
{
cnt++;
if (cnt == blackCount)return true;
else return false;
}
if (root->_color == Red && root->_parent->_color == Red)
{
return false;
}
if (root->_color == Black) cnt++;
return _IsValidRBTree(root->_left, cnt, blackCount)
&& _IsValidRBTree(root->_right, cnt, blackCount);
}
|
封装迭代器
红黑树的迭代器是双向迭代器,所以储存空指针的迭代器没有意义,我们在构造函数上就禁掉用空指针构造
拷贝构造
除了直接构造迭代器,还要提供用const_iterator构造iterator的拷贝构造,而我们依然使用template <class Value,class Ref,class Ptr>作为模板参数,所以要在iterator类型需要在类内手动封装,代码如下
1
2
3
4
5
6
7
8
9
| template <class Value,class Ref,class Ptr>
class __rbtree_iterator
{
typedef __rbtree_iterator<Value, const Value&, const Value*> const_iterator;
typedef __rbtree_iterator<Value, Ref, Ptr> self;
typedef RBTreeNode<Value>* linkeType;
private:
linkType _ptr;
}
|
迭代器的++和–
迭代器的++和--是按前序遍历的顺序和逆序来访问的,而三叉链表有自己独特的访问方式
++
- 操作当前结点时,该结点和该节点的左子树已经完成遍历,前序遍历已经走过
左子树->根
- 该节点有右子树时,前序遍历右子树
- 该节点没有右子树时,该子树完成遍历,回到根节点
root的父节点p再次执行++操作(这里可以用递归),下面介绍循环
- 当根节点
root为p的右结点时,p为根节点的子树也完成了遍历,把p作为所在子树的root,执行上一条操作
- 当根节点
root为p的左结点时,p的左子树完成了遍历,正好下一步访问根节点,即p,返回指向p的迭代器即可
--
- 操作当前结点时,该结点和该节点的右子树已经完成遍历,前序遍历已经走过
右子树->根
- 该节点有左子树时,后序遍历右子树
- 该节点没有左子树时,该子树完成遍历,回到根节点
root的父节点p再次执行--操作(这里可以用递归),下面介绍循环
- 当根节点
root为p的左结点时,p为根节点的子树也完成了遍历,把p作为所在子树的root,执行上一条操作
- 当根节点
root为p的右结点时,p的右子树完成了遍历,正好下一步访问根节点,即p,返回指向p的迭代器即可
完整代码如下
1
2
3
4
5
6
7
8
9
10
11
12
13
14
15
16
17
18
19
20
21
22
23
24
25
26
27
28
29
30
31
32
33
34
35
36
37
38
39
40
41
42
43
44
45
46
47
48
49
50
51
52
53
54
55
56
57
58
59
60
61
62
63
64
65
66
67
68
69
70
71
72
73
74
75
76
77
78
79
80
81
82
83
84
85
86
87
88
89
90
91
92
93
94
95
96
97
98
99
100
101
102
103
104
| template <class Value,class Ref,class Ptr>
class __rbtree_iterator
{
typedef __rbtree_iterator<Value, const Value&, const Value*> const_iterator;
typedef __rbtree_iterator<Value, Ref, Ptr> self;
typedef RBTreeNode<Value>* linkeType;
public:
__rbtree_iterator(const linkeType& ptr)
:_ptr(ptr)
{
if (_ptr == nullptr)exit(-1);
}
__rbtree_iterator(const const_iterator& const_it)
:_ptr(const_it._ptr)
{}
self operator++()
{
if (_ptr == nullptr || _ptr->_right == _ptr )
{
exit(-1);
}
if (_ptr->_right)
{
_ptr = _ptr->_right;
}
else
{
linkeType parent = _ptr->_parent;
while (parent->_right == _ptr)
{
_ptr = parent;
parent = _ptr->_parent;
}
_ptr = parent;
}
return (*this);
}
self operator--()
{
if (_ptr == nullptr)
{
exit(-1);
}
else if (_ptr->_left == _ptr)
{
linkeType right = _ptr->_parent;
while (right)
{
_ptr = right;
right = _ptr->_right;
}
}
else if (_ptr->_left)
{
_ptr = _ptr->_left;
linkeType right = _ptr->_right;
while (right)
{
_ptr = right;
right = _ptr->_right;
}
}
else
{
linkeType parent = _ptr->_parent;
while (parent->_left == _ptr)
{
_ptr = parent;
parent = _ptr->_parent;
}
_ptr = parent;
}
return *this;
}
Ref operator*()
{
return _ptr->_value;
}
Ptr operator->()
{
return &(_ptr->_value);
}
bool operator!=(const self& it)
{
return _ptr != it._ptr;
}
bool operator==(const self& it)
{
return !operator!=(it);
}
private:
linkeType _ptr;
};
|
在RBTree类中声明迭代器类并添加接口
1
2
3
4
5
6
7
8
9
10
11
12
13
14
15
16
17
18
19
20
21
22
23
| public:
typedef __rbtree_iterator<V, V&, V*> iterator;
typedef __rbtree_iterator<V, const V&, const V*>const_iterator;
public:
iterator begin()
{
return iterator(Most_Left());
}
iterator end()
{
return iterator(_header);
}
const_iterator begin()const
{
return const_iterator(Most_Left());
}
const_iterator end()const
{
return const_iterator(_header);
}
|
修改Insert
封装了迭代器之后,我们就可以让insert承担更多的功能了,让它同时返回bool和iterator/const_iterator
std::pair<bool,iterator>
新增关于容量的接口
这里我们新增一个私有成员变量size_t _size记录红黑树中有效节点个数,此处需要修改一下构造函数和Insert函数,这里就不列出来了
1
2
3
4
5
6
7
8
9
| public:
size_t size()const
{
return _size;
}
bool empty()const
{
return _size == 0;
}
|
新增拷贝构造
有了迭代器,拷贝构造也十分好写了
1
2
3
4
5
6
7
| RBTree(const self& rbt)
{
for (auto value : rbt)
{
Insert(value);
}
}
|